

-


移动开发
站-
热门城市 全国站>
-
其他省市
-
-

 400-636-0069
 白羽
2018-06-22
来源 :网络
阅读 632
评论 0
白羽
2018-06-22
来源 :网络
阅读 632
评论 0
摘要:本文将带你了解iO开发之如何自定义UISwitch按钮,希望本文对大家学IOS有所帮助。
因为项目需要在UISwitch按钮上写文字,系统自带的UISwitch是这样的:
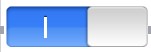
既不能写字,也不能改颜色,于是在网上找到了这么一个自定义的Switch按钮,具体出处找不见了。记录一下,怕以后找不见了。
先看下效果图:
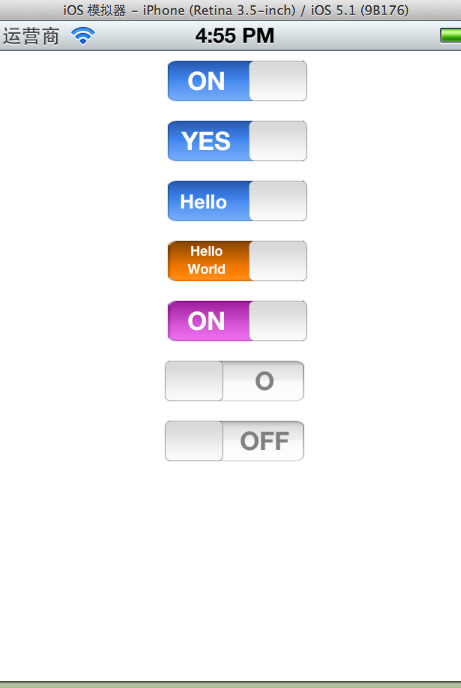
按钮的样式很多,可以文字,可以写多行,文字大小和颜色都可以设置。
看下它的源码:
[cpp] view plain copy
1. #import <Foundation/Foundation.h>
2.
3.
4. @interface HMCustomSwitch : UISlider {
5.     BOOL on;
6.     UIColor *tintColor;
7.     UIView *clippingView;
8.     UILabel *rightLabel;
9.     UILabel *leftLabel;
10.
11.     // private member
12.     BOOL m_touchedSelf;
13. }
14.
15. @property(nonatomic,getter=isOn) BOOL on;
16. @property (nonatomic,retain) UIColor *tintColor;
17. @property (nonatomic,retain) UIView *clippingView;
18. @property (nonatomic,retain) UILabel *rightLabel;
19. @property (nonatomic,retain) UILabel *leftLabel;
20.
21. + (HMCustomSwitch *) switchWithLeftText: (NSString *) tag1 andRight: (NSString *) tag2;
22.
23. - (void)setOn:(BOOL)on animated:(BOOL)animated;

.m文件
[cpp] view plain copy
1. #import "HMCustomSwitch.h"
2.
3.
4. @implementation HMCustomSwitch
5.
6. @synthesize on;
7. @synthesize tintColor, clippingView, leftLabel, rightLabel;
8.
9. +(HMCustomSwitch *)switchWithLeftText:(NSString *)leftText andRight:(NSString *)rightText
10. {
11.     HMCustomSwitch *switchView = [[HMCustomSwitch alloc] initWithFrame:CGRectZero];
12.
13.     switchView.leftLabel.text = leftText;
14.     switchView.rightLabel.text = rightText;
15.
16.     return [switchView autorelease];
17. }
18.
19. -(id)initWithFrame:(CGRect)rect
20. {
21.     if ((self=[super initWithFrame:CGRectMake(rect.origin.x,rect.origin.y,95,27)]))
22.     {
23.         //      self.clipsToBounds = YES;
24.
25.         [self awakeFromNib];        // do all setup in awakeFromNib so that control can be created manually or in a nib file
26.     }
27.     return self;
28. }
29.
30. -(void)awakeFromNib
31. {
32.     [super awakeFromNib];
33.
34.     self.backgroundColor = [UIColor clearColor];
35.
36.     [self setThumbImage:[UIImage imageNamed:@"switchThumb.png"] forState:UIControlStateNormal];
37.     [self setMinimumTrackImage:[UIImage imageNamed:@"switchBlueBg.png"] forState:UIControlStateNormal];
38.     [self setMaximumTrackImage:[UIImage imageNamed:@"switchOffPlain.png"] forState:UIControlStateNormal];
39.
40.     self.minimumValue = 0;
41.     self.maximumValue = 1;
42.     self.continuous = NO;
43.
44.     self.on = NO;
45.     self.value = 0.0;
46.
47.     self.clippingView = [[UIView alloc] initWithFrame:CGRectMake(4,2,87,23)];
48.     self.clippingView.clipsToBounds = YES;
49.     self.clippingView.userInteractionEnabled = NO;
50.     self.clippingView.backgroundColor = [UIColor clearColor];
51.     [self addSubview:self.clippingView];
52.     [self.clippingView release];
53.
54.     NSString *leftLabelText = NSLocalizedString(@"ON","Custom UISwitch ON label. If localized to empty string then I/O will be used");
55.     if ([leftLabelText length] == 0)
56.     {
57.         leftLabelText = @"l";       // use helvetica lowercase L to be a 1.
58.     }
59.
60.     self.leftLabel = [[UILabel alloc] init];
61.     self.leftLabel.frame = CGRectMake(0, 0, 48, 23);
62.     self.leftLabel.text = leftLabelText;
63.     self.leftLabel.textAlignment = NSTextAlignmentCenter;
64.     self.leftLabel.font = [UIFont boldSystemFontOfSize:17];
65.     self.leftLabel.textColor = [UIColor whiteColor];
66.     self.leftLabel.backgroundColor = [UIColor clearColor];
67.     //      self.leftLabel.shadowColor = [UIColor redColor];
68.     //      self.leftLabel.shadowOffset = CGSizeMake(0,0);
69.     [self.clippingView addSubview:self.leftLabel];
70.     [self.leftLabel release];
71.
72.
73.     NSString *rightLabelText = NSLocalizedString(@"OFF","Custom UISwitch OFF label. If localized to empty string then I/O will be used");
74.     if ([rightLabelText length] == 0)
75.     {
76.         rightLabelText = @"O";  // use helvetica uppercase o to be a 0.
77.     }
78.
79.     self.rightLabel = [[UILabel alloc] init];
80.     self.rightLabel.frame = CGRectMake(95, 0, 48, 23);
81.     self.rightLabel.text = rightLabelText;
82.     self.rightLabel.textAlignment = NSTextAlignmentCenter;
83.     self.rightLabel.font = [UIFont boldSystemFontOfSize:17];
84.     self.rightLabel.textColor = [UIColor grayColor];
85.     self.rightLabel.backgroundColor = [UIColor clearColor];
86.     //      self.rightLabel.shadowColor = [UIColor redColor];
87.     //      self.rightLabel.shadowOffset = CGSizeMake(0,0);
88.     [self.clippingView addSubview:self.rightLabel];
89.     [self.rightLabel release];
90.
91.
92. }
93.
94. -(void)layoutSubviews
95. {
96.     [super layoutSubviews];
97.
98.     //  NSLog(@"leftLabel=%@",NSStringFromCGRect(self.leftLabel.frame));
99.
100.     // move the labels to the front
101.     [self.clippingView removeFromSuperview];
102.     [self addSubview:self.clippingView];
103.
104.     CGFloat thumbWidth = self.currentThumbImage.size.width;
105.     CGFloat switchWidth = self.bounds.size.width;
106.     CGFloat labelWidth = switchWidth - thumbWidth;
107.     CGFloat inset = self.clippingView.frame.origin.x;
108.
109.     //  NSInteger xPos = self.value * (self.bounds.size.width - thumbWidth) - (self.leftLabel.frame.size.width - thumbWidth/2);
110.     NSInteger xPos = self.value * labelWidth - labelWidth - inset;
111.     self.leftLabel.frame = CGRectMake(xPos, 0, labelWidth, 23);
112.
113.     //  xPos = self.value * (self.bounds.size.width - thumbWidth) + (self.rightLabel.frame.size.width - thumbWidth/2);
114.     xPos = switchWidth + (self.value * labelWidth - labelWidth) - inset;
115.     self.rightLabel.frame = CGRectMake(xPos, 0, labelWidth, 23);
116.
117.     //  NSLog(@"value=%f    xPos=%i",self.value,xPos);
118.     //  NSLog(@"thumbWidth=%f    self.bounds.size.width=%f",thumbWidth,self.bounds.size.width);
119. }
120.
121. - (UIImage *)image:(UIImage*)image tintedWithColor:(UIColor *)tint
122. {
123.
124.     if (tint != nil)
125.     {
126.         UIGraphicsBeginImageContext(image.size);
127.
128.         //draw mask so the alpha is respected
129.         CGContextRef currentContext = UIGraphicsGetCurrentContext();
130.         CGImageRef maskImage = [image CGImage];
131.         CGContextClipToMask(currentContext, CGRectMake(0, 0, image.size.width, image.size.height), maskImage);
132.         CGContextDrawImage(currentContext, CGRectMake(0,0, image.size.width, image.size.height), image.CGImage);
133.
134.         [image drawAtPoint:CGPointMake(0,0)];
135.         [tint setFill];
136.         UIRectFillUsingBlendMode(CGRectMake(0,0,image.size.width,image.size.height),kCGBlendModeColor);
137.         UIImage *newImage = UIGraphicsGetImageFromCurrentImageContext();
138.         UIGraphicsEndImageContext();
139.
140.         return newImage;
141.     }
142.     else
143.     {
144.         return image;
145.     }
146. }
147.
148.
149.
150. -(void)setTintColor:(UIColor*)color
151. {
152.     if (color != tintColor)
153.     {
154.         [tintColor release];
155.         tintColor = [color retain];
156.
157.         [self setMinimumTrackImage:[self image:[UIImage imageNamed:@"switchBlueBg.png"] tintedWithColor:tintColor] forState:UIControlStateNormal];
158.     }
159.
160. }
161.
162. - (void)setOn:(BOOL)turnOn animated:(BOOL)animated;
163. {
164.     on = turnOn;
165.
166.     if (animated)
167.     {
168.         [UIView  beginAnimations:nil context:nil];
169.         [UIView setAnimationDuration:0.2];
170.     }
171.
172.     if (on)
173.     {
174.         self.value = 1.0;
175.     }
176.     else
177.     {
178.         self.value = 0.0;
179.     }
180.
181.     if (animated)
182.     {
183.         [UIView commitAnimations];
184.     }
185. }
186.
187. - (void)setOn:(BOOL)turnOn
188. {
189.     [self setOn:turnOn animated:NO];
190. }
191.
192.
193. - (void)endTrackingWithTouch:(UITouch *)touch withEvent:(UIEvent *)event
194. {
195.     NSLog(@"preendTrackingWithtouch");
196.     [super endTrackingWithTouch:touch withEvent:event];
197.     NSLog(@"postendTrackingWithtouch");
198.     m_touchedSelf = YES;
199.
200.     [self setOn:on animated:YES];
201. }
202.
203. - (void)touchesBegan:(NSSet*)touches withEvent:(UIEvent*)event
204. {
205.     [super touchesBegan:touches withEvent:event];
206.         NSLog(@"touchesBegan");
207.     m_touchedSelf = NO;
208.     on = !on;
209. }
210.
211. - (void)touchesEnded:(NSSet*)touches withEvent:(UIEvent*)event
212. {
213.     [super touchesEnded:touches withEvent:event];
214.     NSLog(@"touchesEnded");
215.
216.     if (!m_touchedSelf)
217.     {
218.         [self setOn:on animated:YES];
219.         [self sendActionsForControlEvents:UIControlEventValueChanged];
220.     }
221. }
222.
223. -(void)dealloc
224. {
225.     [tintColor release];
226.     [clippingView release];
227.     [rightLabel release];
228.     [leftLabel release];
229.
230.     [super dealloc];
231. }
232.
233. @end
看代码可以知道,其实它是通过继承UISlider控件实现的,UISlider的左右分别是个UILabel,当YES的时候,滑块滑到了最右边,NO的时候滑到了最左边。
如何在代码中使用它呢?很简单:
[cpp] view plain copy
1. - (void)loadView
2. {
3.     UIView *contentView = [[UIView alloc] initWithFrame:[[UIScreen mainScreen] applicationFrame]];
4.     self.view = contentView;
5.     contentView.backgroundColor = [UIColor whiteColor];
6.
7.     // Standard ON/OFF
8.     HMCustomSwitch *switchView = [[HMCustomSwitch alloc] initWithFrame:CGRectZero];
9.     switchView.center = CGPointMake(160.0f, 20.0f);
10.     switchView.on = YES;
11.     [contentView addSubview:switchView];
12.     [switchView release];
13.
14.     // Custom YES/NO
15.     switchView = [HMCustomSwitch switchWithLeftText:@"YES" andRight:@"NO"];
16.     switchView.center = CGPointMake(160.0f, 60.0f);
17.     switchView.on = YES;
18.     [contentView addSubview:switchView];
19.
20.     // Custom font and color
21.     switchView = [HMCustomSwitch switchWithLeftText:@"Hello " andRight:@"ABC "];
22.     switchView.center = CGPointMake(160.0f, 100.0f);
23.     switchView.on = YES;
24.     [switchView.leftLabel setFont:[UIFont boldSystemFontOfSize:13.0f]];
25.     [switchView.rightLabel setFont:[UIFont italicSystemFontOfSize:15.0f]];
26.     [switchView.rightLabel setTextColor:[UIColor blueColor]];
27.     [contentView addSubview:switchView];
28.
29.     // Multiple lines
30.     switchView = [HMCustomSwitch switchWithLeftText:@"Hello\nWorld" andRight:@"Bye\nWorld"];
31.     switchView.center = CGPointMake(160.0f, 140.0f);
32.     switchView.on = YES;
33.     switchView.tintColor = [UIColor orangeColor];
34.     switchView.leftLabel.font = [UIFont boldSystemFontOfSize:9.0f];
35.     switchView.rightLabel.font = [UIFont boldSystemFontOfSize:9.0f];
36.     switchView.leftLabel.numberOfLines = 2;
37.     switchView.rightLabel.numberOfLines = 2;
38.     switchView.leftLabel.lineBreakMode = NSLineBreakByWordWrapping;
39.     switchView.rightLabel.lineBreakMode = NSLineBreakByWordWrapping;
40.     [contentView addSubview:switchView];
41.
42.     switchView = [[HMCustomSwitch alloc] init];
43.     switchView.center = CGPointMake(160.0f, 180.0f);
44.     switchView.on = YES;
45.     switchView.tintColor = [UIColor purpleColor];
46.     [contentView addSubview:switchView];
47.     [switchView release];
48.
49.     switchView = [HMCustomSwitch switchWithLeftText:@"l" andRight:@"O"];
50.     switchView.center = CGPointMake(160.0f, 220.0f);
51. //  customSwitch.tintColor = [UIColor colorWithRed:125.f/255.f green:157.f/255.f blue:93.f/255.f alpha:1.0];
52. //  customSwitch.tintColor = [UIColor colorWithRed:125.f/255.f green:157.f/255.f blue:93.f/255.f alpha:1.0];
53.     [contentView addSubview:switchView];
54.
55.     // Standard ON/OFF
56.     switchView = [[HMCustomSwitch alloc] init];
57.     switchView.center = CGPointMake(160.0f, 260.0f);
58.     switchView.tintColor = [UIColor colorWithRed:125.f/255.f green:157.f/255.f blue:93.f/255.f alpha:1.0];
59.     [switchView addTarget:self action:@selector(switchFlipped:) forControlEvents:UIControlEventValueChanged];
60.     [contentView addSubview:switchView];
61.     [switchView release];
62.
63.
64.
65.     UIToolbar *toolbar = [[UIToolbar alloc] initWithFrame:CGRectMake(0, 420, 320, 40)];
66.     toolbar.tintColor = [UIColor colorWithRed:125.f/255.f green:157.f/255.f blue:93.f/255.f alpha:1.0];
67.     [contentView addSubview:toolbar];
68.
69.     [contentView release];
70. }
71.
72. -(void)switchFlipped:(HMCustomSwitch*)switchView
73. {
74.     NSLog(@"switchFlipped=%f  on:%@",switchView.value, (switchView.on?@"Y":@"N"));
75.
76. }
本文由职坐标整理并发布,希望对同学们有所帮助。了解更多详情请关注职坐标移动开发之IOS频道!
 喜欢 | 0
 不喜欢 | 0


您输入的评论内容中包含违禁敏感词
我知道了

请输入正确的手机号码
请输入正确的验证码
您今天的短信下发次数太多了,明天再试试吧!
我们会在第一时间安排职业规划师联系您!
您也可以联系我们的职业规划师咨询:

版权所有 职坐标-一站式IT培训就业服务领导者 沪ICP备13042190号-4
上海海同信息科技有限公司 Copyright ©2015 www.zhizuobiao.com,All Rights Reserved.
 沪公网安备 31011502005948号


 索取资料
索取资料

 答疑解惑
答疑解惑

 技术交流
技术交流

 职业测评
职业测评

 面试技巧
面试技巧

 高薪秘笈
高薪秘笈


